
I was surprised with the popularity of my previous post. Does it mean you are really interested in this kind of posts? Wow, this means the time spent typing here is really appreciated by you! Thanks!
And with such motivation I need to share another post with you.
With a baby every day is different - it's incredible... and with so many babysitters ;) Now I've got two of them to help me, plus one grandma. I wonder what is this babysitter reorganization going to end like :-D And no, we don't know it either.
Have I told you that Balrog got his fifth tooth? We've been waiting for it for a week because now we can judge when they are going to appear by the volume of sound alone.
He spent his 7-months party on all fours - me must have assumed that age obliges. I don't even hope he's going to crawl, but it was nice to see him attempting to move hopping like a hare. ^^
Zaskoczyła mnie popularność mojego poprzedniego wpisu. Czy to znaczy, że naprawdę interesują Was takie wpisy? Wow, to by oznaczało, że czas poświęcony na pisanie tego bloga nie idzie na marne! Dzięki!
A z taką motywacją mam potrzebę podzielić się z Wami kolejną notatką.
Przy dziecku każdy dzień jest inny - to niesamowite... i przy tylu nianiach ;) Obecnie mam do pomocy dwie nianie i jedną babcię. Ciekawe jak się zakończy ta reorganizacja nianiowa :-D Tak, my też tego nie wiemy.
A z taką motywacją mam potrzebę podzielić się z Wami kolejną notatką.
Przy dziecku każdy dzień jest inny - to niesamowite... i przy tylu nianiach ;) Obecnie mam do pomocy dwie nianie i jedną babcię. Ciekawe jak się zakończy ta reorganizacja nianiowa :-D Tak, my też tego nie wiemy.
Pisałam już że Balrog dorobił się piątego zęba? Czekaliśmy na niego tydzień, bo umiemy już ocenić kiedy ma wyjść po natężeniu dźwięku ;)))
Imprezkę na 7 miesięcy przekucał na czworaka - chyba uznał, że wiek zobowiązuje. Już się nie łudzę, że będzie raczkować, ale miło było popatrzeć jak próbuje się przemieścić w zajęczych podskokach. ^^
Red Sonja is done!
I will review the photos tomorrow and will try to prepare some kind of a larger report. But until then I will not leave you with nothing - I will show you at least a part of it: how I painted the shield :)
Red Sonja gotowa!
Jutro przejrzę zdjęcia i postaram się przygotować jakieś większe sprawozdanie. Póki co, pokażę Wam choć trochę - jak malowałam tarczę :)
PS: We're giving our workshop to Balrog :( Every day it becomes less and less of a workshop. How did you organize and place your miniature-related stuff in your appartments? I keep adding to the cellar, I keep adding to the overhead storage, I keep adding to the wardrobe, and I think that our appartment is a kind of like Twoflower's Luggage. ;)))
P.S. Oddajemy Balrogowi pracownię :( Z dnia na dzień jest nią coraz mniej. Jak Wy rozmieściliście figurkowe graty po mieszkaniu? Dokładam do piwnicy, dokładam do pawlacza, dokładam do szafy i tak sobie myślę, że to moje mieszkanie jest trochę jak skrzynia Dwukwiata ;)))

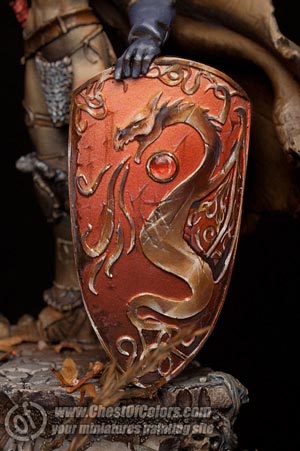
Below I am showing the shield just after the base color was airbrushed. So far I used:
- P3 Menoth White Highlight - all over the surface
- Vallejo Model Color Woodgrain - on the bottom part
- Winsor&Newton Ink 965 Orange - on the middle part
- Vallejo Model Air 71077 Wood - thinned a lot, added a slight yellowish tint to the upper part of the shield.
- P3 Menoth White Highlight - po całości
- Vallejo Model Color Woodgrain - na dole
- Winsor&Newton Ink 965 Orange - po środku
- Vallejo Model Air 71077 Wood - mocno rozcieńczona, lekko zażółciła górną powierzchnię tarczy.

When the background was prepared I started to work on chiaroscuro on the dragon, which was supposed to be painted in NMM gold. Colors for the chiaroscuro:
- P3 Morrow White
- Vallejo Model Color 807 Oxford Blue
Kiedy tło miałam przygotowane, zabrałam się za światłocienie na smoku, będzie w złotym NMM.
Kolory na światłocień:
- P3 Morrow White
- Vallejo Model Color 807 Oxford Blue


I searched for a good spot for light on the wings but it was difficult for me to find it:
Szukałam dobrego miejsca na światło na skrzydłach smoka, ale jakoś ciężko mi je wyczuć:

Finally I added Citadel Colour 61-14 Snakebite Leather:
(Does this shield also disturb you with the composition of its ornaments tumbling to the right?)
Na koniec dołożyłam Citadel Colour 61-14 Snakebite Lather:
(Czy Wam też to przeszkadza, że kompozycja na tarczy Wali się na prawą stronę?)

And so I still wasn't satisfied with the chiaroscuro on the wings :-/
No i ciągle jestem niezadowolona ze światłocienia na skrzydłach :-/

I need to let the steam off after the NMM, so I begin to paint corrosion. I test the shapes with a subtle color:
Potrzebuję odreagować od NMM i biorę się za korozję. Delikatnym kolorem testuję kształt:


I had some time to think about it and I decided to leave the wings in their embarassing state and began changing them.
I liked the idea of open-work patterned wings, but first I had to recover the original background color:
Małam czas do namysłu i uznałam, że nie ma co siać popeliny i trzeba te skrzydło przerobić.
Spodobał mi się pomysł ażurowych skrzydeł, ale najpierw muszę przywrócić kolor tła w to miejsce:


Background recovered, so I could add some weathering immediately.
For me it doesn't matter in which order it is done: if the freehand is first and weatering second, or the other way. Unless you apply paint in thick layers, in which case it's better to apply corrosion first and the pattern later, for otherwise you may see the pattern under weathering (or at least that is what I think about it ;))
Kolor tła przywrócony i dodałam od razu podniszczenie.
Według mnie kolejność jest obojętna - czy najpierw wzór a potem podniszczenie, czy odwrotnie.
No chyba, że nakładasz grubo farbę, to jednak lepiej najpierw rozmieścić korozję a potem wzorek, bo inaczej spod podniszczenia może przebijać faktura wzoru (tak sobie dumam ;))


Break from painting the swirling patterns for painting some corrosion - that's the way I work :-/ I do everything simultaneously.
Przerwa w malowaniu wywijasów na korozję - tak to właśnie ze mną jest :-/ robię wszystko na raz.


So I returned to the wings to add some color.
No i wróciłam do skrzydeł, żeby dodać koloru.

Final effect on the finished model:
Efekt końcowy na gotowym modelu:
Efekt końcowy na gotowym modelu:
I hope I didn't bore you too much :-]
And even if I did, I'll leave you here as it's time to feed Balrog who seems to demand sacrifice!
Mam nadzieję, że Was nie zanudziłam :]
A nawet jeśli tak, to zostawię Was tutaj, bo to pora na karmienie Balroga, który najwyraźniej domaga się ofiary!


Excellent work as always - I appreciate the time you take to make these tutorials!
ReplyDeleteAna, I have written to you and your husband through CMON and you were kind to spend a great deal of time answering my questions recently. I just found your blog and fell like I have found gold. Keep up the great work. I would like to feature your website (blog) on my blog. May I use some of your finished work to highlight the entry?
ReplyDeleteBest wishes,
Steven Lloyd
Thank you, guys. I'll keep on trying :)
ReplyDelete@closerlookbooks:
Sure, feel free to use any of my pictures, as long as credit is given and link to my site is included. I am happy to know people like my works and want to show them to others :)
WoW!You even modelled and painted up your son....almost real I'd say. :-)
ReplyDeleteSeriously though, beautiful work on that shield and a nice tutorial as well.
Cheers
Christopher
HOLA
ReplyDeleteMuy bueno el escudo y muy bien el PAP.Gracias por tu tiempo al hacerlo.
un saludo
Te twoje posty to jakaś magia, a ten.. brak mi słów.
ReplyDeleteTeż tak chcę umieć :).
Bardzo fajny był post o trzymaniu pędzla. Długo potem to ćwiczyłem.
Starałem się również w rożnych ilościach nabierać farby na pędzel i robić smugi na kartkach.
Teraz muszę poćwiczyć mieszanie farb jak to opisałaś w "2 Ways to Chiaroscuro Effect"
Próbowałem z Regal Blue i Ultramarines ale efekt przejść jest jeszcze zbyt widoczny.
love ending comment
ReplyDeleteDzieło sztuki - jak dla mnie najlepiej pomalowana tarcza jaka w zyciu widziałem :)
ReplyDelete...tez czuje sie jakbym znalazł złoto :)
pozdrawiam
Ańa, let me publish a translation of your article for the Russian site diceworld.ru
ReplyDeleteLink to your blog and your authorship will be noted.
P.S. Sorry for bad English
very awesome!!! thanks for your patience in writing and translating your precious tutorials
ReplyDeleteThanks a lot! Wielkie dzięki!
ReplyDelete@Lobanovskiy Oleg:
Sure, please do. Just mention me as the author and link to the original versions, please.
Great work as expected. Quick question. Which company produce this model?
ReplyDeleteThanks
Nice NMM on the shield. Very nice again.
ReplyDeleteThe smile of your boy beats the shield though. Good to see you are fine and the little one is happy.
Greetings from Berlin ! - Mati/Badsmile
Wow. First time to this blog and I'm impressed.
ReplyDeletePosting step by step images of your painting is wonderful. It allows us to see how a miniature moves from one stage through the next to arrive at the end result.
Seeing your revision of the wings was brilliant. We've all been there when part of a miniature just doesn't work. It was really helpful to read your comments about how you felt about the wings and then to see how you went about making them better.
Subscribed.
Absolutely fantastic! Not only do you show us some of the best paintjobs I have ever, but you also manage to do a very good tutorial and beeing a parent, which takes a lot of time (have two myself). Amazing, absolutely amazing.
ReplyDeleteGreetings from Sweden
Denniz
@Akaranseth - this one is from Andrea Miniatures. Reviewed in another post on the blog.
ReplyDeleteThanks a lot for your comments, guys :) I really appreciate them!
Very nice tutorial, excellent paintwork, You're very talented!
ReplyDeleteThe storage problem is very well known to me: When I met my wife we bought a house with 3 bedrooms. First we had a lot of room, like a king: music room, hobby room, and bedroom. Then my son came. Then my daughter, then I changed jobs and needed a home office. Now I share the hobby room with the washing machine and dryer and home office, my music equipment is in my son's room, and we have the smallest bedroom of the three :o)
But I have learned to optimize storage: I have a lot of boxes, wooden or metal, to store everything in, and we gave up the garage to put in storage racks: 45 cm deep, 2 m high, and 10 m long! That works ok :o)
Greetings